


Resizing Images for Digital Competitions and AV’s Method 1
Resizing for Projection and AV’s
When processing Images for our digital projection competitions you will need to resize
it to our projectors resolution which is-
1024 pixels X 768 pixels @ 72 PPI
Let’s take a quick look at what these figures mean.
Size
The first part define the size of your picture in Pixels, in this case it will be a rectangle that is 1024 Px wide by 768 Px high. This is the size our projector projects the Images at, so this size will fill the screen on our projector as 1024 px X 768 px is the fixed size of our projector, or looked another way it’s the Matrix our projector uses, think of graph paper.
Resolution
The part after the @ is the resolution in this case 72 PPI. PPI stands for Pixels per Inch. The whole question of resolution is probably the least understood part. All it is when talking about the image when it’s on the screen is how big each individual pixel is in a so many per Inch format. At 72 pixels per Inch there will be 72 pixels every Inch of the frame, at higher resolutions there will be more, so at 300 PPI there will be 300 pixels every inch, there will be more pixels in the file and the file will be bigger and each pixel will be smaller.
This is where the problem is in that the Inch referred to in PPI is the printed Inch,
we are not printing we’re talking about a screen Inch and it’s variable! We are used
to an Inch being an Inch, but when we talk about screen or projector resolution (which
is the same thing) the size of the picture we see is determined by the size of the
monitor screen and what resolution you have your screen set to. Confused? For screen
the resolution required is always 72PPI, any larger would be dumped by the graphics
driver. A screens maximum resolution is 72PPI. If you save at a higher resolution
on a file for screen which is the same as saying for the web all you are doing is
making the file size bigger which just makes uploading and downloading take longer,
the pictures won’t be any better quality This is where re-
Using Photoshop to alter picture size and resolution.
PS has oodles of ways to resize an Image, I’ll just show a couple of my favourite ways here. Most people go strait to Image>Image Size, but there are better ways.
Method 1 -
- Open your image in PS.
- If it has Layers, Flatten the Image.
- Select the Crop Tool.
- Enter the values Width 1024 px Height 768 px Resolution 72 Pixels per Inch . (Pic 01)
Important Note You must enter the px after the numbers or PS will revert to the unit you have set for your Rulers which could mean a huge picture. Just the opposite of what we want.
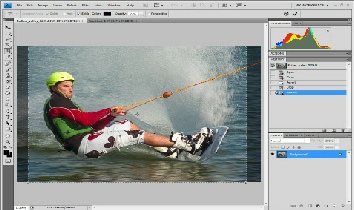
- Click and Drag the Crop Tool over the Image to select the part of the Image you want to retain. (Pic 02)
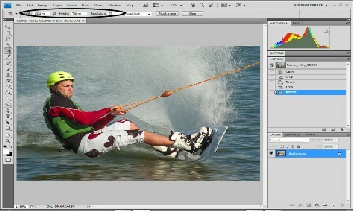
Pic 01
Pic 02
Aspect Ratio.
Pic 02 shows the main problem we come across when re-
The advantage of this method is you can decide which part of the Image you want to be your picture, and which part of the picture you want to leave out, it doesn’t have to be as much of the picture as you can get, we only need around 20% of the pixels available, so we can select a heavy crop of part of the picture and as long as you have at least 1024px selected on the long side the quality will not be affected when selecting for projection. This means that if you are creating an Audio Visual presentation you can use different parts of the same image to make different slides. The only time when this does not fully apply is if you are zooming into or panning across the image in your AV, you will need the number of pixels required by the largest picture. Then you would set up the required pixels in the Crop Tool as above.
After that short diversion we are finally ready to commit our Crop by either pressing the Enter Key or Double Clicking within the Crop Box.
When we do this the picture shrinks -
Sharpening is best done after re-
File Types
When saving for screen or projection (which is really the same thing) we can only use 8bit RGB images which is what the hardware requires, we could use any of a number of different File Types, but for ease of use and universality Jpeg is as good as any. Go to Save As, in the File Type drop down menu select Jpeg, if Jpeg is not an option you must either have layers open (in which case Flatten the Image (Layer>Flatten Image)) or you must have the Bit Depth set to 16 (Image>Mode>8 Bit/Channel). Once you have Flattened the Image and set Bit Depth to 8, Jpeg will be an option in the File Type drop down menu.
A dialogue box opens asking for the compression using a Quality scale from 1 (maximum compression) to 12 (no compression), around 10 is fine.
Before you hit the OK button set the File Name you want. For competition this should
be Your preferred Number followed by Your Initials followed by your Picture Title
all separated by underscores e.g. 16_CJ_Water Skier.jpg. (Underscore is the shifted
‘-
And we’re done, transfer the image to your memory stick and that Image is ready for competition. For an alternative method click Advanced Resizing
Here is a YouTube link to a tutorial I’ve done on this method.
Apologies for the coughing, ambient noise, and the delay at the end trying to find the off key LOL.